BTG 2024
Bridging the Technological Gap Workshop
PsychoPy, Python, eye-tracking, tobii, tobii_research, experimental psychology, tutorial, experiment, DevStart, developmental science, workshop
Hello hello!!! This page has been created to provide support and resources for the tutorial that will take place during the Bridging the Technological Gap Workshop.
What will you learn?
This workshop will focus on using Python to run and analyze an eye-tracking study.
We will focus on:
How to implement eye-tracking designs in Python
How to interact with an eye-tracker via Python
How to extract and visualize meaningful eye-tracking measures from the raw data
What will you need?
Python
In this tutorial, our primary tool will be Python!! There are lots of ways to install python. We recommend installing it via Miniconda. However, for this workshop, the suggested way to install Python is using Anaconda.
You might ask….Then which installation should I follow? Well, it doesn’t really matter! Miniconda is a minimal installation of Anaconda. It lacks the GUI, but has all the main features. So follow whichever one you like more!
Once you have it installed, we need a few more things. For the Gaze Tracking & Pupillometry Workshop (the part we will be hosting) we will need some specific libraries and files. We have tried our best to make everything as simple as possible:
Libraries
We will be working with a conda environment (a self-contained directory that contains a specific collection of Python packages and dependencies, allowing you to manage different project requirements separately). To create this environment and install all the necessary libraries, all you need is this file:
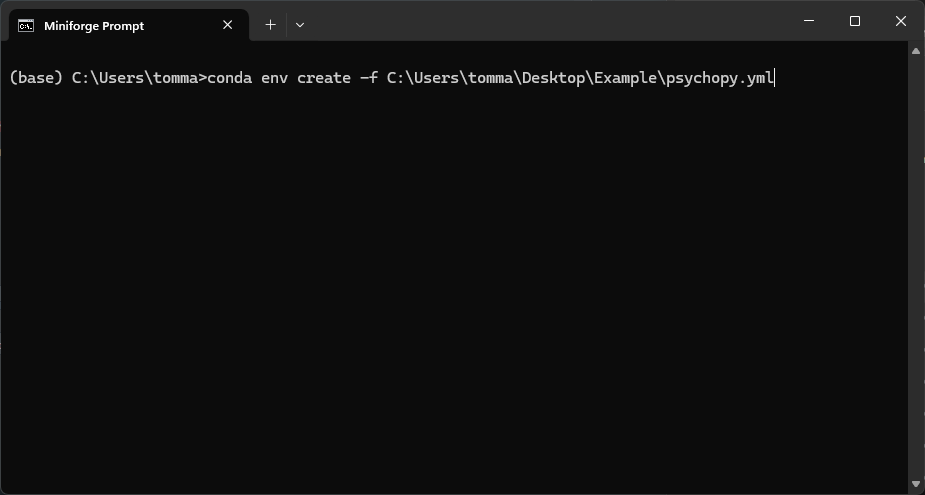
Once you have downloaded the file, simply open the anaconda/miniconda terminal and type conda env create -f, then simply drag and drop the downloaded file onto the terminal. This will copy the filename with its absolute path. In my case it looked something like this:

Now you will be asked to confirm a few things (by pressing Y) and after a while of downloading and installing you will have your new workshop environment called Psychopy!
Now you should see a shortcut in your start menu called Spyder(psychopy), just click on it to open spyder in our newly created environment. If you don’t see it, just reopen the anaconda/miniconda terminal, activate your new environment by typing conda activate psychopy and then just type spyder.
Files
We also need some files if you want to run the examples with us. Here you can download the zip files with everything you need:
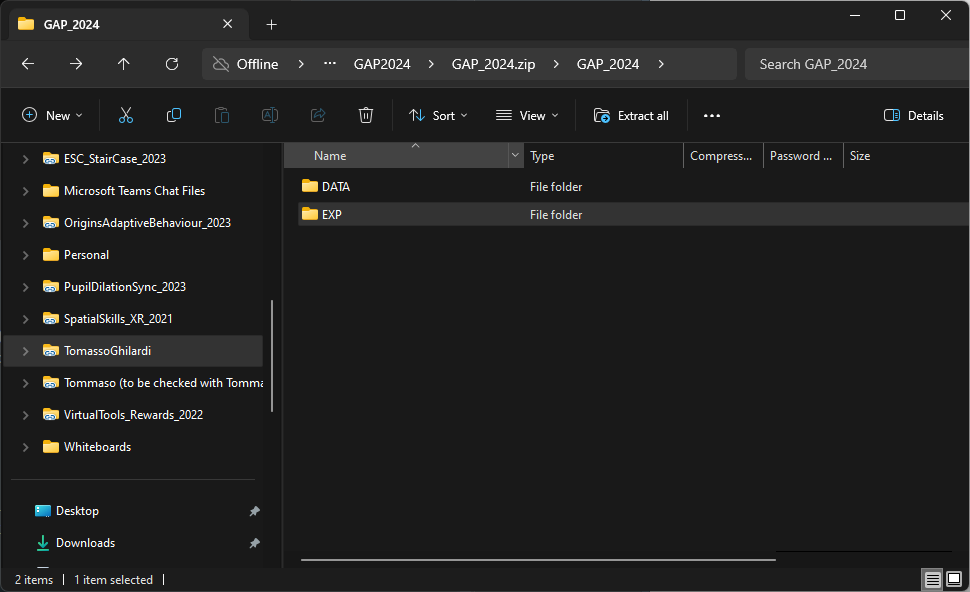
Once downloaded, simply extract the file by unzipping it. For our workshop we will work together in a folder that should look like this:

If you have a similar folder… you are ready to go!!!!
Q&A
We received many interesting questions during the workshop! We’ll try to add new tutorials and pages to address your queries. However, since this website is a side project, it may take some time.
In the meantime, we’ll share our answers here. They may be less precise and exhaustive than what we’ll have in the future, but they should still provide a good idea of how to approach things.
Videos
We received several questions about working with videos and PsychoPy while doing eye-tracking. It can be quite tricky, but here are some tips:
Make sure you’re using the right codec.
If you need to change the codec of the video, you can re-encode it using a tool like
Handbrake (remember to set the constant framerate in the video option)
Below, you’ll find a code example that adapts our Create an eye-tracking experiment tutorial to work with a video file. The main differences are:
We’re showing a video after the fixation.
We’re saving triggers to our eye-tracking data and also saving the frame index at each sample (as a continuous number column).
import os
import glob
import pandas as pd
import numpy as np
# Import some libraries from PsychoPy
from psychopy import core, event, visual, prefs
prefs.hardware['audioLib'] = ['PTB']
from psychopy import sound
import tobii_research as tr
#%% Functions
# This will be called every time there is new gaze data
def gaze_data_callback(gaze_data):
global trigger
global gaze_data_buffer
global winsize
global frame_indx
# Extract the data we are interested in
t = gaze_data.system_time_stamp / 1000.0
lx = gaze_data.left_eye.gaze_point.position_on_display_area[0] * winsize[0]
ly = winsize[1] - gaze_data.left_eye.gaze_point.position_on_display_area[1] * winsize[1]
lp = gaze_data.left_eye.pupil.diameter
lv = gaze_data.left_eye.gaze_point.validity
rx = gaze_data.right_eye.gaze_point.position_on_display_area[0] * winsize[0]
ry = winsize[1] - gaze_data.right_eye.gaze_point.position_on_display_area[1] * winsize[1]
rp = gaze_data.right_eye.pupil.diameter
rv = gaze_data.right_eye.gaze_point.validity
# Add gaze data to the buffer
gaze_data_buffer.append((t,lx,ly,lp,lv,rx,ry,rp,rv,trigger, frame_indx))
trigger = ''
def write_buffer_to_file(buffer, output_path):
# Make a copy of the buffer and clear it
buffer_copy = buffer[:]
buffer.clear()
# Define column names
columns = ['time', 'L_X', 'L_Y', 'L_P', 'L_V',
'R_X', 'R_Y', 'R_P', 'R_V', 'Event', 'FrameIndex']
# Convert buffer to DataFrame
out = pd.DataFrame(buffer_copy, columns=columns)
# Check if the file exists
file_exists = not os.path.isfile(output_path)
# Write the DataFrame to an HDF5 file
out.to_csv(output_path, mode='a', index =False, header = file_exists)
#%% Load and prepare stimuli
os.chdir(r'C:\Users\tomma\Desktop\EyeTracking\Files')
# Winsize
winsize = (960, 540)
# create a window
win = visual.Window(size = winsize,fullscr=False, units="pix", screen=0)
# Load images and video
fixation = visual.ImageStim(win, image='EXP\\Stimuli\\fixation.png', size = (200, 200))
Video = visual.MovieStim(win, filename='EXP\\Stimuli\\Video60.mp4', loop=False, size=[600,380],volume =0.4, autoStart=True)
# Define the trigger and frame index variable to pass to the gaze_data_callback
trigger = ''
frame_indx = np.nan
#%% Record the data
# Find all connected eye trackers
found_eyetrackers = tr.find_all_eyetrackers()
# We will just use the first one
Eyetracker = found_eyetrackers[0]
#Start recording
Eyetracker.subscribe_to(tr.EYETRACKER_GAZE_DATA, gaze_data_callback)
# Crate empty list to append data
gaze_data_buffer = []
Trials_number = 10
for trial in range(Trials_number):
### Present the fixation
win.flip() # we flip to clean the window
fixation.draw()
win.flip()
trigger = 'Fixation'
core.wait(1) # wait for 1 second
Video.play()
trigger = 'Video'
while not Video.isFinished:
# Draw the video frame
Video.draw()
# Flip the window and add index to teh frame_indx
win.flip()
# add which frame was just shown to the eyetracking data
frame_indx = Video.frameIndex
Video.stop()
win.flip()
### ISI
win.flip() # we re-flip at the end to clean the window
clock = core.Clock()
write_buffer_to_file(gaze_data_buffer, 'DATA\\RAW\\Test.csv')
while clock.getTime() < 1:
pass
### Check for closing experiment
keys = event.getKeys() # collect list of pressed keys
if 'escape' in keys:
win.close() # close window
Eyetracker.unsubscribe_from(tr.EYETRACKER_GAZE_DATA, gaze_data_callback) # unsubscribe eyetracking
core.quit() # stop study
win.close() # close window
Eyetracker.unsubscribe_from(tr.EYETRACKER_GAZE_DATA, gaze_data_callback) # unsubscribe eyetracking
core.quit() # stop studyCalibration
We received a question about the calibration. How to change the focus time that the eye-tracking uses to record samples for each calibration point. Luckily, the function from the Psychopy_tobii_infant repository allows for an additional argument that specifies how long we want the focus time (default = 0.5s). Thus, you can simply change it by running it with a different value.
Here below we changed the example of Calibrating eye-tracking by increasing the focus_time to 2s. You can increase or decrease it based on your needs!!
import os
from psychopy import visual, sound
# import Psychopy tobii infant
os.chdir(r"C:\Users\tomma\Desktop\EyeTracking\Files\Calibration")
from psychopy_tobii_infant import TobiiInfantController
#%% window and stimuli
winsize = [1920, 1080]
win = visual.Window(winsize, fullscr=True, allowGUI=False,screen = 1, color = "#a6a6a6", unit='pix')
# visual stimuli
CALISTIMS = glob.glob("CalibrationStim\\*.png")
# video
VideoGrabber = visual.MovieStim(win, "CalibrationStim\\Attentiongrabber.mp4", loop=True, size=[800,450],volume =0.4, unit = 'pix')
# sound
Sound = sound.Sound(directory + "CalibrationStim\\audio.wav")
#%% Center face - screen
# set video playing
VideoGrabber.setAutoDraw(True)
VideoGrabber.play()
# show the relative position of the subject to the eyetracker
EyeTracker.show_status()
# stop the attention grabber
VideoGrabber.setAutoDraw(False)
VideoGrabber.stop()
#%% Calibration
# define calibration points
CALINORMP = [(-0.4, 0.4), (-0.4, -0.4), (0.0, 0.0), (0.4, 0.4), (0.4, -0.4)]
CALIPOINTS = [(x * winsize[0], y * winsize[1]) for x, y in CALINORMP]
success = controller.run_calibration(CALIPOINTS, CALISTIMS, audio = Sound, focus_time=2)
win.flip()