import os
from psychopy import visual, sound

os.chdir(r"C:\Users\tomma\Desktop\EyeTracking\Files\Calibration")

# import Psychopy tobii infant
from psychopy_tobii_infant import TobiiInfantControllerCalibrating eye-tracking
eye-tracking, calibration, tobii, psychopy, tobii infant, experimental psychology, tutorial, experiment, DevStart, developmental science
Calibration
Before running an eye-tracking study, we usually need to do a calibration. What is a calibration you ask??
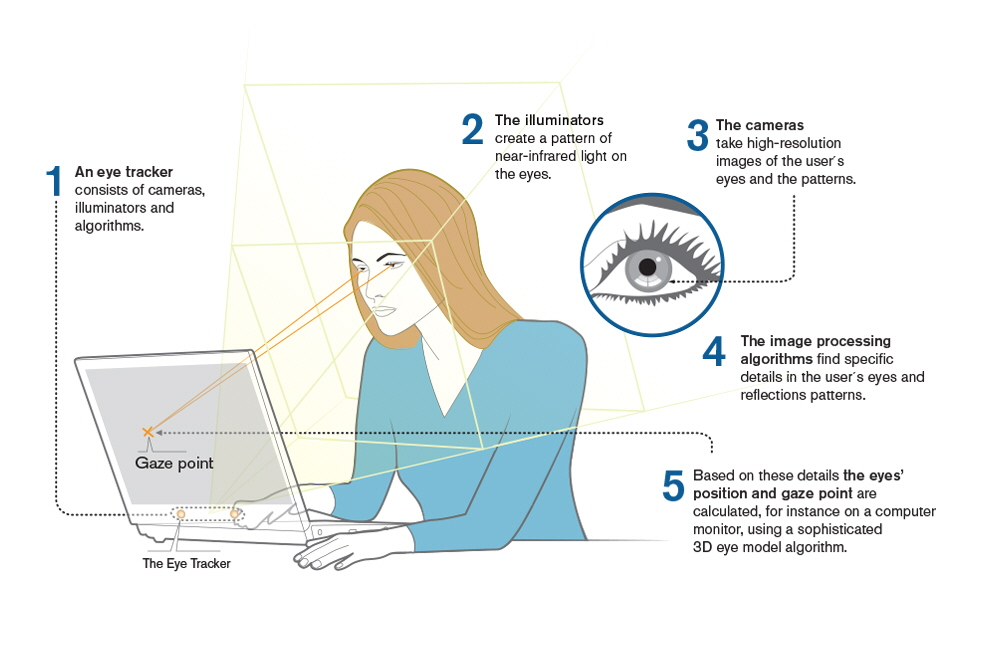
Well, an eye-tracker works by using illuminators to emit near-infrared light towards the eye. This light reflects off the cornea, creating a visible glint or reflection that the eye-tracker’s sensors can detect. By capturing this reflection, the eye-tracker can determine the position of the eye relative to a screen, allowing it to pinpoint where the user is looking, known as the gaze point.
There are different ways to run a calibration using tobii eye-trackers. Here below the ones we have used:
Tobii pro
Tobii offers a nice software called Tobii Pro, which allows you to run calibrations with considerable flexibility. However, Tobii Pro requires a paid license, which may not always be available to you. If you’re fortunate enough to have a paid license for Tobii Pro, by all means, take advantage of it. But if you don’t, don’t worry! Keep reading, as we have alternative solutions to share with you.
Tobii pro eye-tracker manager
Another possibility is to use Tobii pro eye-tracker manager, an alternative software from Tobii. Unlike Tobii Pro, this application is free to use, though its features are more limited. If you’re looking to use Tobii software and don’t require advanced calibration options, this could be a suitable choice.
Psychopy tobii infant
Finally, if you are broke (like us!) and/or you want flexibility in running your calibration, one of the best option is to use the Tobii SDK that allows us to interact with the eyetrackers using Python. However, running a calibration using the SDK is pretty complex. We are trying to write a nice script to make it easier but in the meantime we have another solution…. We can use !! Psychopy tobii infants is a nice python code that wraps around the Tobii SDK making it easy to run a calibration, especailly an infant friendly one!! This code collection allows us to use the Tobii SDK with the Psychopy library.
Finally, if you are broke and you want flexibility in running your calibration, one of the best options is to use the Tobii SDK. How we explained in previous tutorials (Create an eye-tracking experiment), this SDK allows the interaction with eye-trackers using Python. However, implementing a calibration using the SDK can be quite challenging……. We’re are trying to write an easy to explain and run code to perform calibrations, but in the meantime, we have an alternative solution!!
Enter Psychopy_tobii_infant! This is a series of python functions that effectively wraps around the Tobii SDK, making it much easier to run calibrations, particularly those designed for infants. This code collection enables us to use the Tobii SDK in conjunction with the PsychoPy library, offering a more accessible approach to eye-tracking calibration!!
In the following paragraph we will see together how to prepare and use Psychopy tobii infant to run a nice and infant friendly calibration.
Use Psychopy tobii infant to run studies
One question that you could ask yourself is… can I use Psychopy tobii infants to run my eye-tracking studies?? Well yes!! We have actually used it for few of our studies. Psychopy tobii infants provides an easy intarface between tobii eye-trackers and psychopy.
Over the years we have personally move away from it but we often come back to it for some of its handy functionalities (e.g. the calibration).
Download
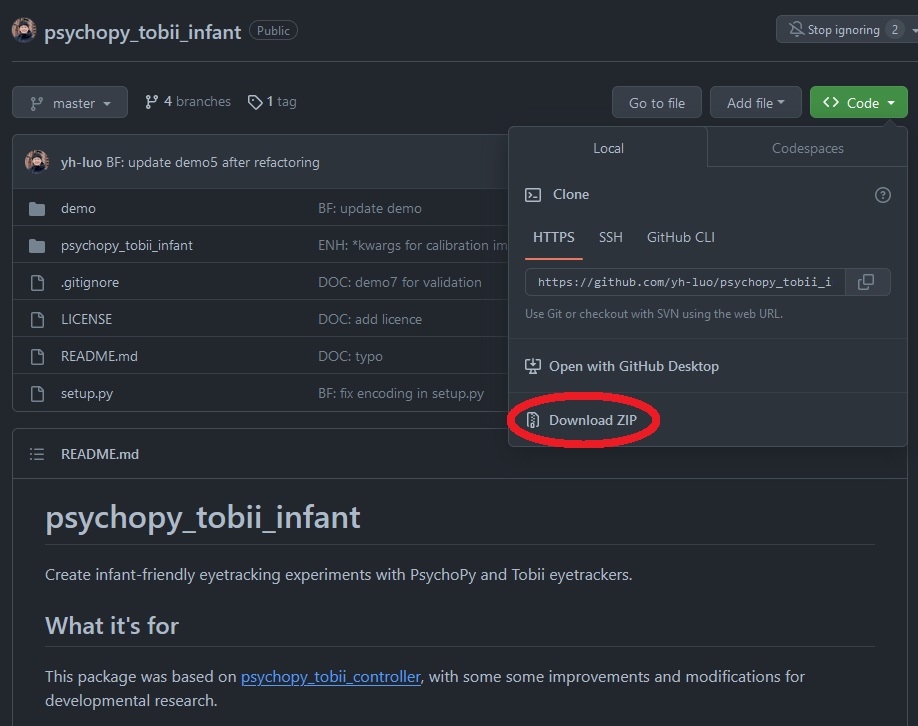
Ok, let’s get started!! First thing first we need to download the codes of Psychopy tobii infant. You can find them here on GitHub: https://github.com/yh-luo/psychopy_tobii_infant.
On this page, you can click on <>Code and then on Download ZIP as shown below:
Perfect!! Now that we have downloaded the code as a zip file we need to:
extract the file
identify the folder “psychopy_tobii_infant”
copy this folder in the same location of your eye-tracking experiment script
You should end up like with something like this:

Now we are all set and ready to go !!!!!!!!!!
Importing the functions
We’ll now import the required libraries and custom functions. First, we’ll set the working directory to where our stimuli and the psychopy_tobii_infant folder are located. This allows Python to access these resources. Once set, we can easily import the necessary libraries and the custom functions from psychopy_tobii_infant for our eye-tracking experiment.
Done!! Now we can use its function to run our code.
Settings
Before running our calibration we need to prepare a few things!
First, we create a nice window. As we explained before, this is the canvas where we will draw our stimuli.
winsize = [1920, 1080]
win = visual.Window(winsize, fullscr=True, allowGUI=False,screen = 1, color = "#a6a6a6", unit='pix')
Second we will import a few stimuli. I will explain later what we need them for, just trust me for now. If you want to follow along these are the stimuli we have used. Just download them and unzip them.
Once you have downloaded the stimuli we can use glob to find all the .png in the folder, read the video file and the audio file.
The .pngs are images of cute cartoon animals that we will use in the calibration.
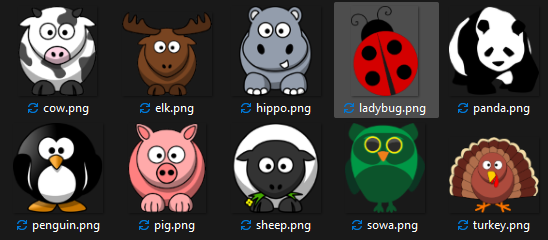
Let’s find them and put the in a list.
# visual stimuli
CALISTIMS = glob.glob("CalibrationStim\\*.png")

# video
VideoGrabber = visual.MovieStim(win, "CalibrationStim\\Attentiongrabber.mp4", loop=True, size=[800,450],volume =0.4, unit = 'pix')

# sound
Sound = sound.Sound(directory + "CalibrationStim\\audio.wav")
Perfect we have found all the stimuli that we need.
Now we will use the TobiiInfantController that we have imported before to connect to the eye-tracker. It is extremely simple:
EyeTracker = TobiiInfantController(win)Perfect we now even have our eye-tracker!!
Find the eyes
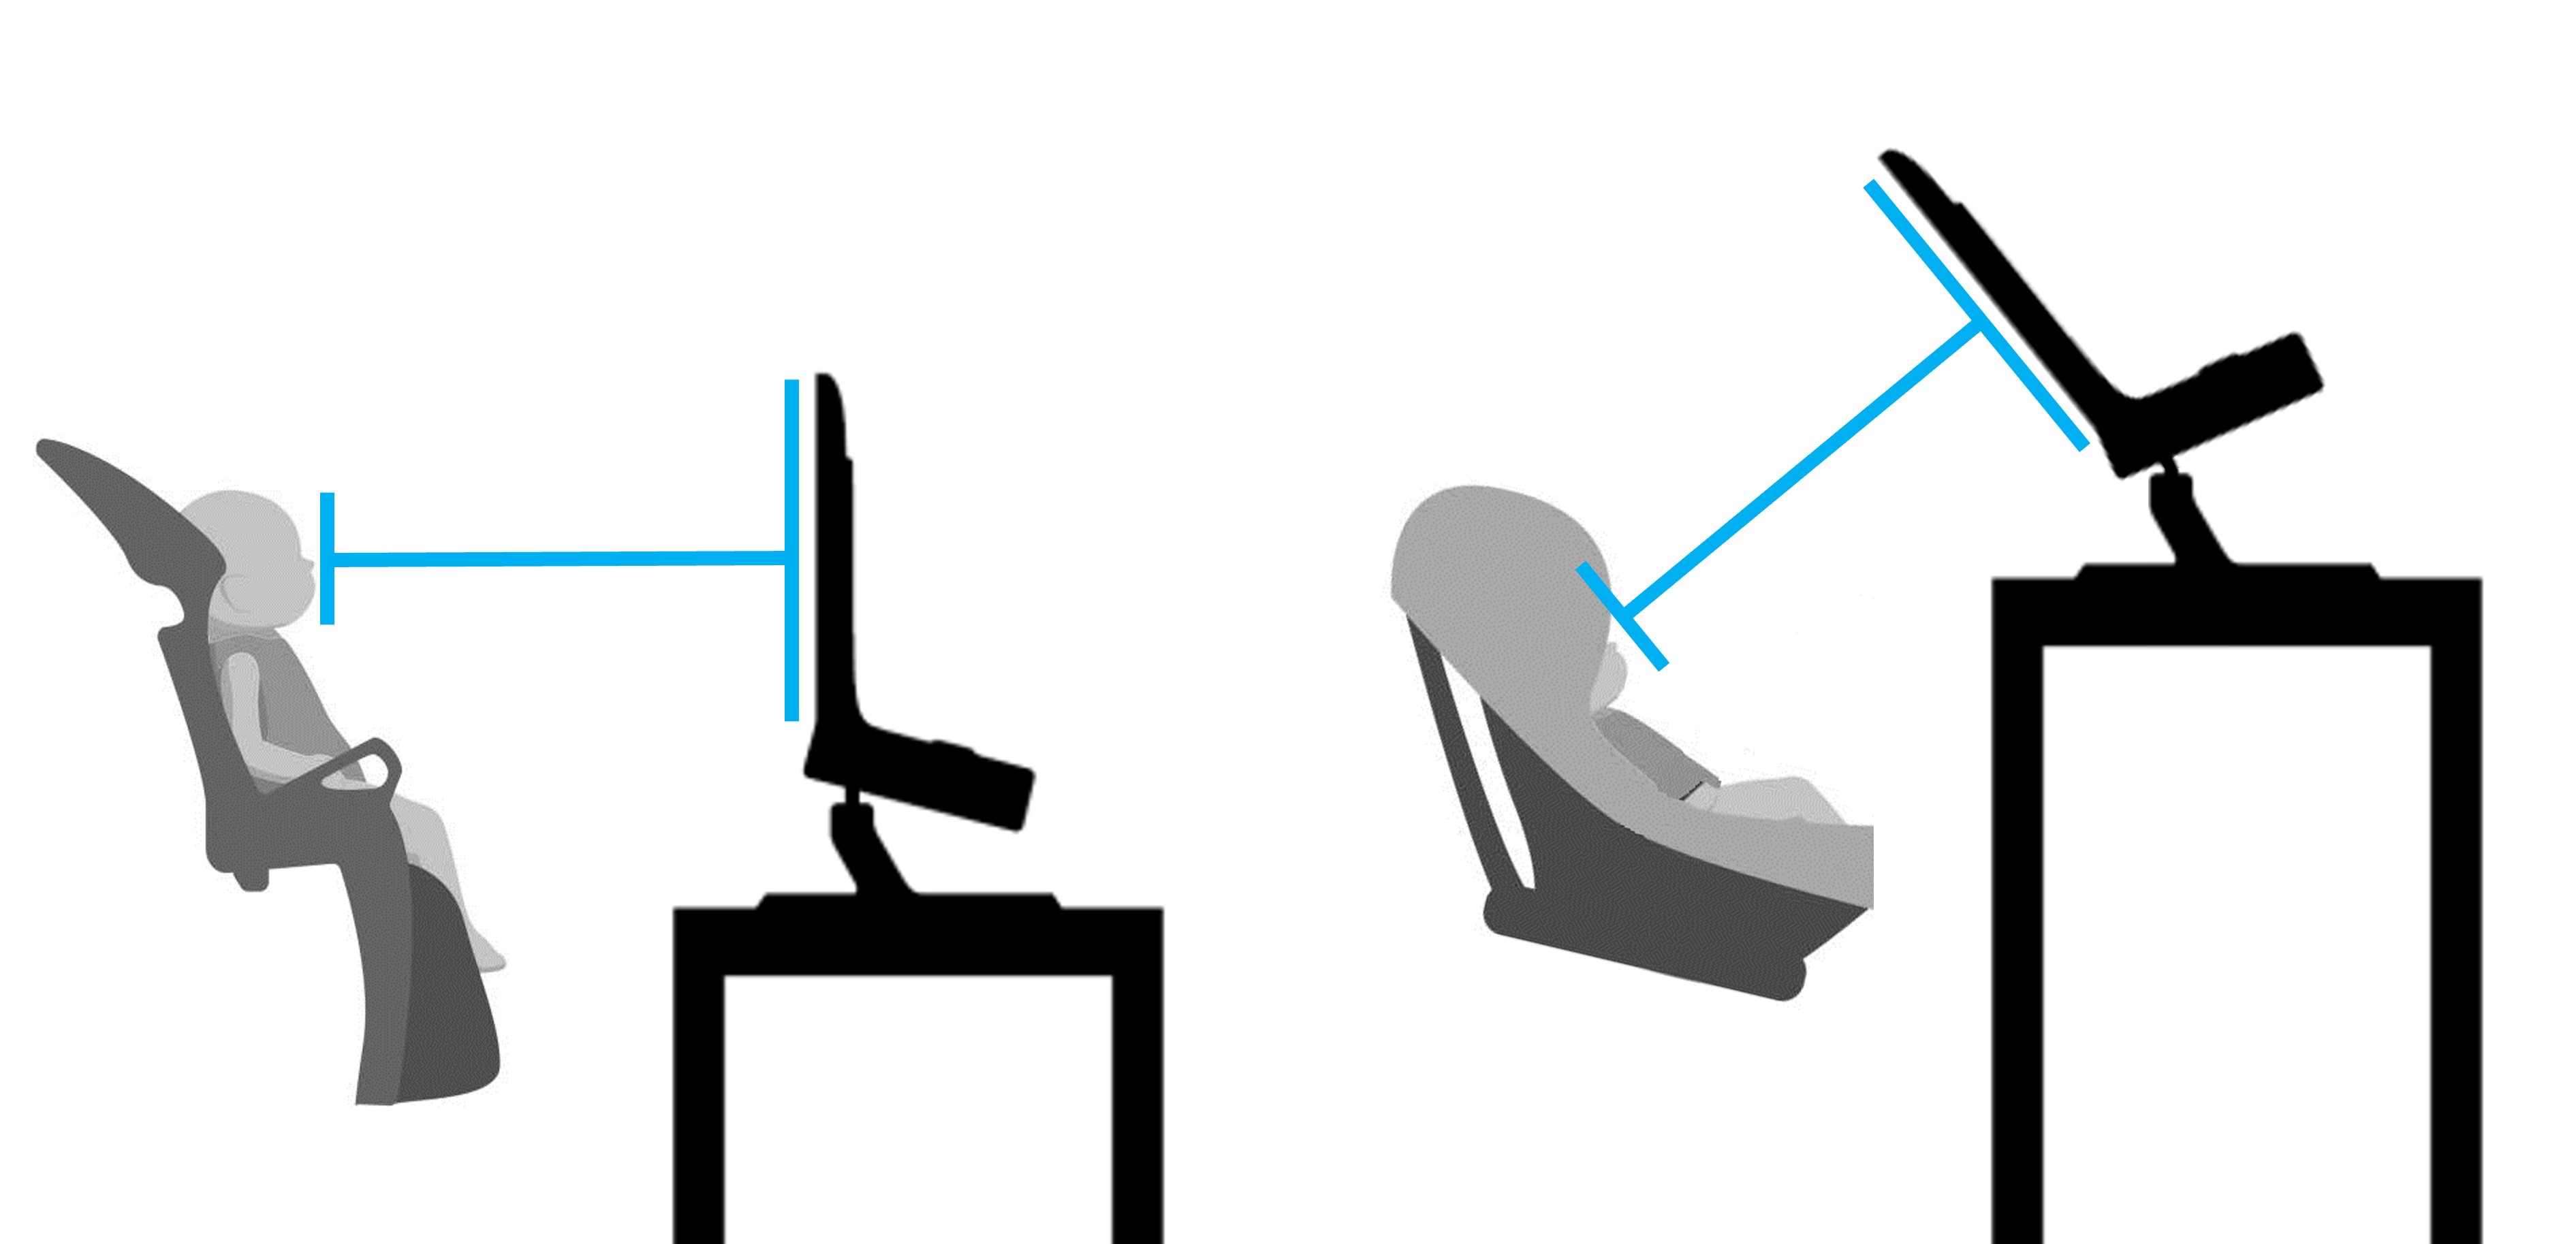
The first step for a proper calibration involves centering the participant’s eyes on the screen and ensuring their gaze is perpendicular to it. This positioning is crucial for accurate data collection.
You can see here two classic scenarios of infants in front of a eye-tracker. Again, the important thing is that the head and gaze of the child is perpendicular to the screen
But how to do it?? We can eyeball it but it’s not going to be easy. Luckily we can get some help!!
Using EyeTracker.show_status() we can see the eyes of the participant in relation to the screen. Therefore we can move either the eye-tracker or the infant to make sure the gaze is parallel to the screen. Sounds good doesn’t it??!!?? However, most of the times infants won’t look at the screen if nothing interesting is presented on it. Thus we need to capture their attention!!!!!
We can use the video we imported before. We set it to autodraw (each time the window is flipped a new frame will be drawn automatically) and the we start it by calling play().
# set video playing
VideoGrabber.setAutoDraw(True)
VideoGrabber.play()

# show the relative position of the subject to the eyetracker
EyeTracker.show_status()
This is what we will see:
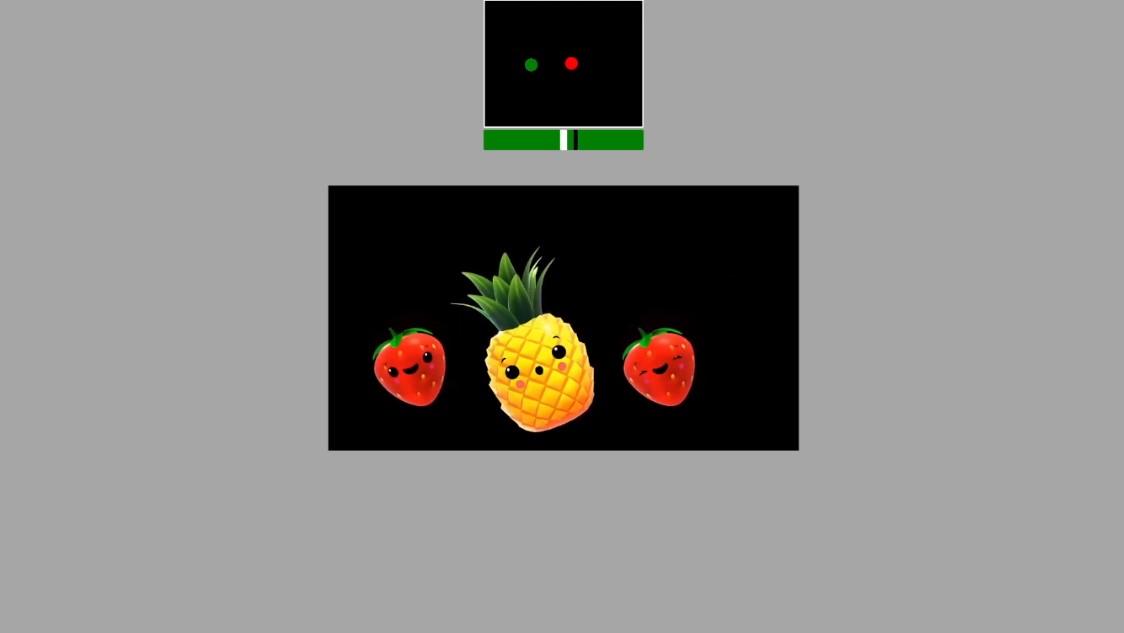
In the center of the screen you will see the video we imported. In this case, a video of funny dancing fruits. But more importantly, at the top we can see the eyes of our participant. We need to make sure that we actually see the eyes and that they are centered in the screen. In addition is important to notice that under the eye position there is a green bar. The black line on it represents the distance of the participant head from the eye-tracker (the more on the right, the further from the screen; the more on the left, the closer to it). Ideally the black line should be in the center (overlapping the white thick line). This would indicate that the head of the participant is at an ideal distance (usually 65cm).
Once we are satisfied with the position of the eye-tracker and the infant we can press spacebar to proceed to the next step!! Before doing that we will stop the presentation of
# stop the attention grabber
VideoGrabber.setAutoDraw(False)
VideoGrabber.stop()
Calibration
Ok, now that we are happy with the setup let’s actually run the calibration. It only takes two steps.
First, we need to define the amount and the position of the points where we will present our stimuli. In infant studies we usually rely on 5 points. Four on the corners of the screen and one in the center.
The easiest way to define them is by using Psychopy’s normalized unit.
CALINORMP = [(-0.4, 0.4), (-0.4, -0.4), (0.0, 0.0), (0.4, 0.4), (0.4, -0.4)]As we usually like to work in pixel units, we could define them in pixels or just transform our CALINORMP using the dimension of our window.
CALIPOINTS = [(x * winsize[0], y * winsize[1]) for x, y in CALINORMP]Perfect! Now we run our calibration by running
success = controller.run_calibration(CALIPOINTS, CALISTIMS, audio = Sound)Ok, but what is going to happen??? After running this line we will start our calibration. Using the numbers on our keyboard (use 1~9 (depending on the number of calibration points) to present) we will show 1 of the .png stimuli that we have listed in CALISTIMS in the selected position. The presentation of the cartoon will be accompanied by the sound passed with Sound. The cartoon will start to zoom in and out in the attempt to capture the attention of the infant.
Once we are confident that the infant is looking at the cartoon zooming in and out you can press Space to collect the first calibration sample. Once that’s been done, we can move to the following points. Once all point are done we can press Enter. This will show the result of our calibration, e.g:
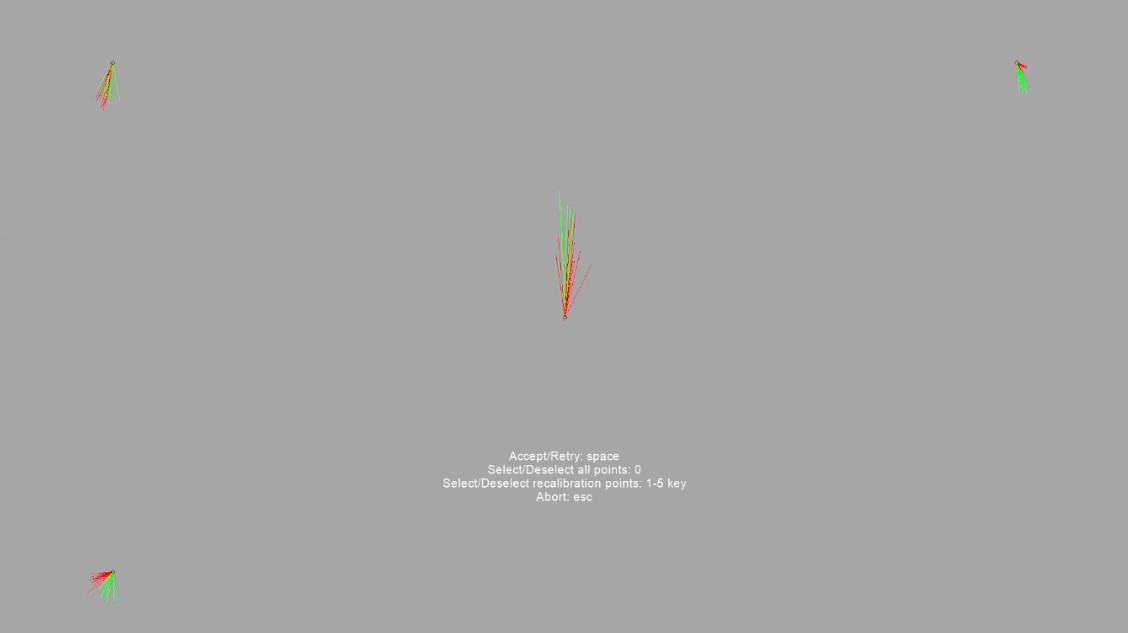
The red and green lines represent the gaze data from the left and right eyes, respectively. Each cluster of lines corresponds to a calibration point, with the central cluster indicating the main fixation point. Tight convergence of the lines within each cluster signifies high calibration accuracy and precision, while any significant discrepancies or spread indicate potential calibration issues.
As you may have noticed, the bottom right corner shows no data. What happened?? Well probably the infant was not looking when we pressed the Spacebar. How to fix it? We can simply press the number on the keyboard related to the point that failed and then press Spacebar. This will restart the calibration for only that point. So we can focus on getting more data for this point to add to our already collected.
In case more points are without data –or the data is just bad– we can select multiple points or even all of them (pressing 0). If we are happy with our calibration we can just press the Spacebar without selecting any points.
The match between the infant eye and the position on the screen is made in the exact moment you press the Space button. If you wait too long to press it, the infant might look away and beat you to it! It may appear counterintuitive, but we usually prefer to be quite fast in our calibration process. Since duration doesn’t matter but timing does, you will get better results! The fast switching seems to also capture infants’ attention better, meaning that they are more likely to follow the location of the cartoon with their gaze.
Remember, infants can easily get bored with our stimuli. Thus, being rapid and sudden in showing them may work to our advantage.
Well done!! Calibration is done!!!!
Now we can start with our eye-tracking study!
Here below the entire code.
import os
from psychopy import visual, sound

# import Psychopy tobii infant
os.chdir(r"C:\Users\tomma\Desktop\EyeTracking\Files\Calibration")
from psychopy_tobii_infant import TobiiInfantController


#%% window and stimuli
winsize = [1920, 1080]
win = visual.Window(winsize, fullscr=True, allowGUI=False,screen = 1, color = "#a6a6a6", unit='pix')

# visual stimuli
CALISTIMS = glob.glob("CalibrationStim\\*.png")

# video
VideoGrabber = visual.MovieStim(win, "CalibrationStim\\Attentiongrabber.mp4", loop=True, size=[800,450],volume =0.4, unit = 'pix')

# sound
Sound = sound.Sound(directory + "CalibrationStim\\audio.wav")


#%% Center face - screen

# set video playing
VideoGrabber.setAutoDraw(True)
VideoGrabber.play()

# show the relative position of the subject to the eyetracker
EyeTracker.show_status()

# stop the attention grabber
VideoGrabber.setAutoDraw(False)
VideoGrabber.stop()


#%% Calibration

# define calibration points
CALINORMP = [(-0.4, 0.4), (-0.4, -0.4), (0.0, 0.0), (0.4, 0.4), (0.4, -0.4)]
CALIPOINTS = [(x * winsize[0], y * winsize[1]) for x, y in CALINORMP]

success = controller.run_calibration(CALIPOINTS, CALISTIMS, audio = Sound)
win.flip()
