Github Desktop
So, you’ve started coding and your friend or supervisor suggested creating a repository for your work? Sounds like a smart move! In this tutorial, we’ll explore how to use one of the simplest tools for managing repositories and code on GitHub: GitHub Desktop.
Warning!
Please note that this tutorial is very basic and aims to introduce some key concepts of Git and GitHub through GitHub Desktop. It’s not intended to be an exhaustive guide. It’s designed for someone who has heard of GitHub but doesn’t know where to start. There’s much more to explore and learn beyond what’s covered here!
Github
![]()
Let’s start with the basics: What exactly is GitHub? Put simply, GitHub is a code hosting platform that focuses on collaboration and version control. But what does that really mean?
Hosting platform:
Think of GitHub as a specialized website where you can upload and store your code.Collaboration:
Once your code is on GitHub, you have the option to let others view it. If you choose, they can even contribute to your project, helping improve and refine your code.Version control:
GitHub records every change and modification to your code. This means you or others can check how the code has changed over time and in case can revert the code back to a specific stage.
Ok, now that you know what github is… go and make an account!! Come back once you are done!!!
Github desktop: your gateway to version control
There are several ways to interact with GitHub and manage your repositories: git command line, GitKraken, GitHub Desktop, or the website interface. For beginners and those seeking simplicity, GitHub Desktop is an excellent choice.
GitHub Desktop offers a user-friendly approach to handle your basic version control needs. It’s straightforward enough for newcomers yet capable enough for most projects. You can easily clone repositories, commit changes, and manage your work without diving you crazy with complex commands.
While GitHub Desktop is perfect for getting started and handling everyday tasks, more advanced users working on complex projects might eventually explore more powerful tools. For now, let’s focus on GitHub Desktop - it’s the ideal balance of functionality and ease of use for most us.
So go download it and get back here!! Once installed you need to log in and then you are ready for your first repository.
Make your first repository
Ok now we are in!! Let’s create a new repository. You can click on “File” and then “New repository…” (you can also just press CTRL + N).
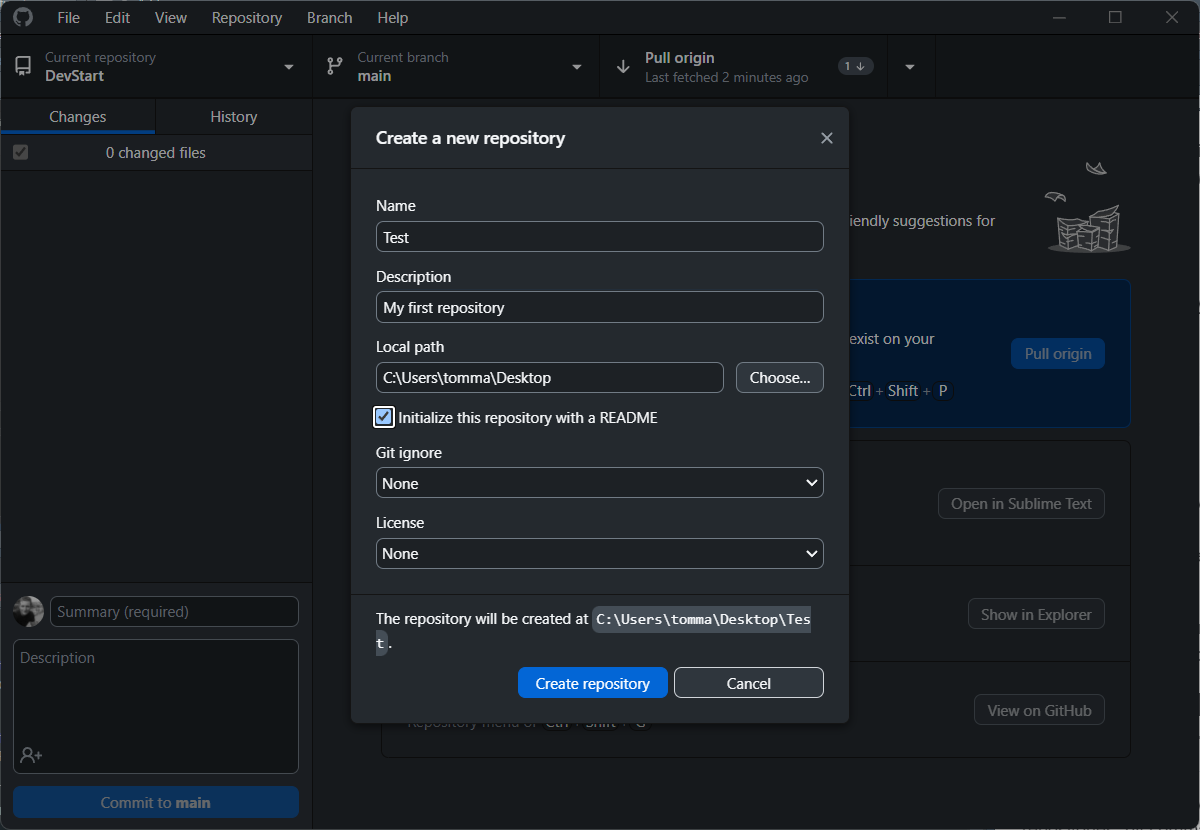
Now let’s go through the process of setting up your repository:
Name: Give a name to your repository. In this example, it’s simply called “Test.”
Description: This is, as it sounds, a brief description of what your repository is all about.
Local path: This is essentially where GitHub Desktop will create the folder for your repository. In this case, it will create a Test folder on the desktop (as mentioned at the bottom of the interface).
README check-box: This allows you to include a README file in the folder that will be created. We’ll discuss the README file later, but for now, know that it’s a file using markdown where you can add information about your repository. It’s the first interface between your code and someone checking your repository. It’s advisable to always have a README file. At worst, you can keep it empty initially.
Git ignore: This is a file where you can specify files that GitHub won’t track changes for. For simple projects, you often won’t need it.
License: This allows you to specify the license you want to use for your code. While it’s often overlooked, it’s worth considering how you want your code to be used by others.
For our first repository these settings will work fine. Click create and then lets see what happened.
Publish
You’ll notice that GitHub Desktop is displaying two key pieces of information. First, it’s indicating that there are “No local changes” (we still haven’t done anything). Just below this, you’ll see a prominent blue button prompting you to publish your repository.
At this point, your repository exists only on your local machine, in the folder we created earlier. When we publish it to GitHub, the repository will be saved online, making it accessible from any device.
Now, let’s proceed with publishing your repository.
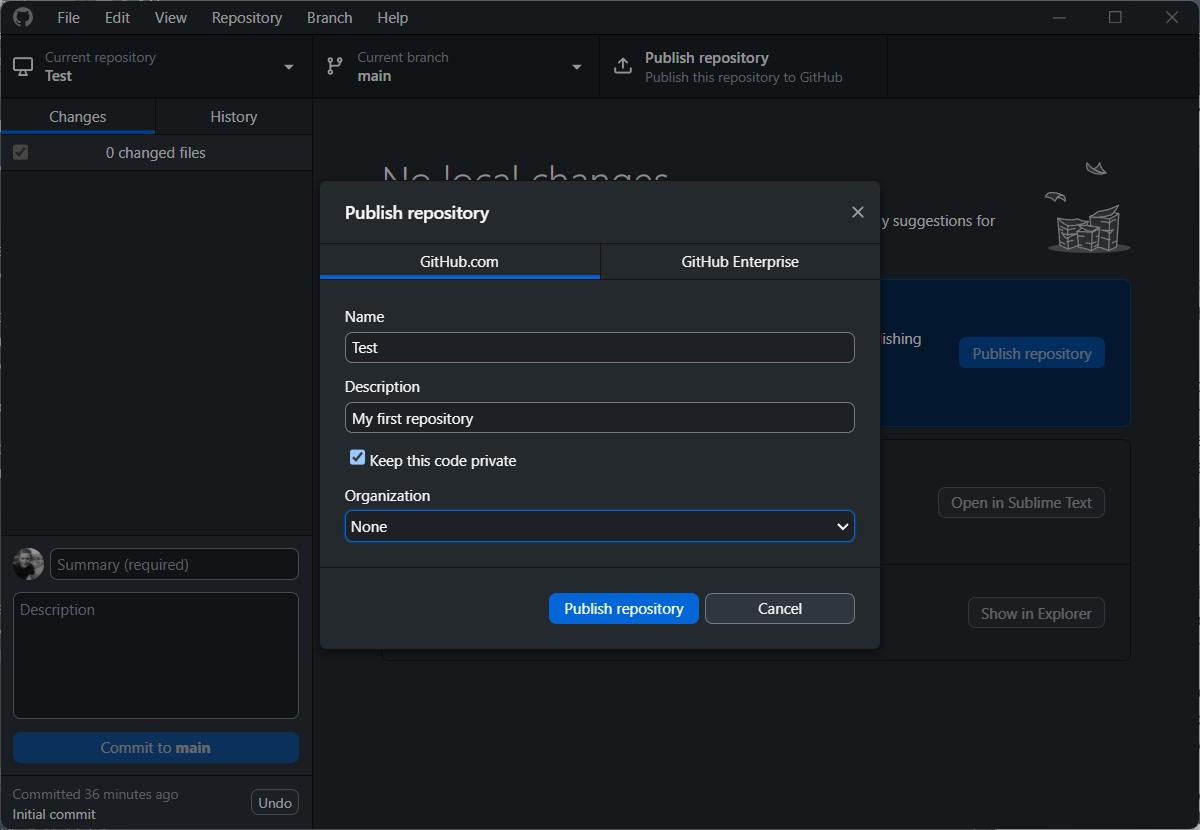
The main option to consider here is the “Keep this code private” checkbox. This determines whether just you or everyone on GitHub will be able to see your repository. As this is just a test repository, it’s advisable to keep it private.
In the organization tab, you can choose whether to publish the repository in your personal account or in an organization you’re part of. For this basic tutorial, we’ll assume you’re not part of any organization yet, so you should leave this set to “None.”
Go ahead and publish your repository. It will take a few seconds, and then you’re done. Your repository is now on GitHub! If you check it online, it should look something like this:
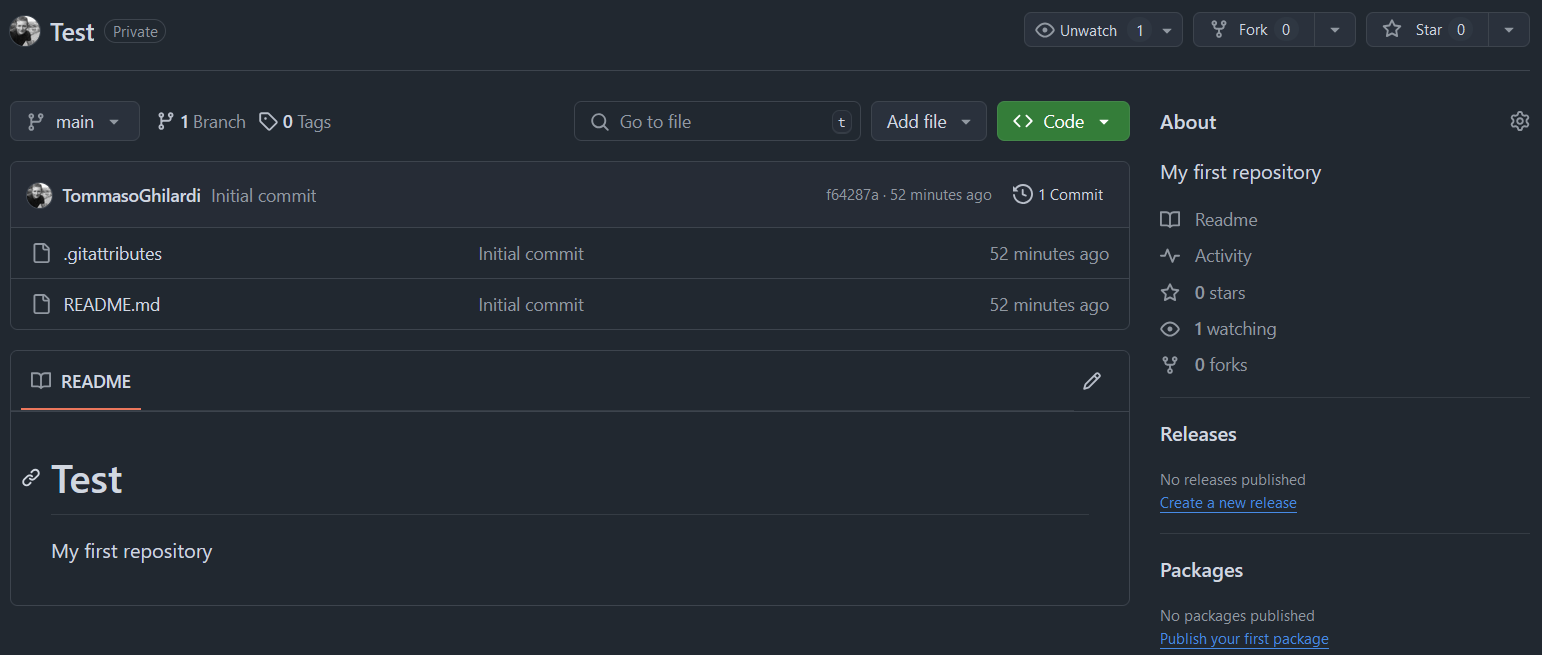
It may appear quite empty at first glance, but there’s an important detail to note. Below the list of files, you’ll notice a rendering of the README file. Currently, this file only contains a title (“Test”) and the simple description of our repository that we provided earlier.
note that there may be additional files in your repository folder on the pc and on the github website. These are files that github auto generates and are needed to keep everything in check. As this is a basic tutorial please ignore them. They do not hurt!
However, we can (and we will) modify the README file to display all the information we want to show on the main page of the repository. This README file is a powerful tool for presenting your project to visitors, and we’ll explore how to make the most of it as we progress.
Changes
Let’s return to our local folder and make some changes. In this example, we’ll add a Python file called example.py. The content of this file is a simple loop that prints “Such a nice repository” 1000 times. The specific code isn’t crucial; you can add any file or code you prefer.
Now that we’ve added a file, we want our README file to reflect and explain our code. Let’s open the README file (you can use any text editor you’re comfortable with). We’ll add a line to describe our new file: The example.py file is a simple Python file that uses a loop to print “Such a nice repository” 1000 times.
README files on GitHub use Markdown, a simple syntax for formatting text. For example, to make text bold, you should enclose it in asterisks: * bold *. I won’t cover how to write in Markdown (and its different varieties), but you can check it out here.
You can not only add files to a repository but also folders. The key advantage of adding folders, besides organizing your code better, is that each folder can have its own README file. This allows for more detailed explanations of the code and purpose of each section.
Commit
After making these changes, let’s return to GitHub Desktop. You’ll notice that GitHub Desktop displays the files with changes on the left side of the app. The README file is marked with a yellow icon because it was modified, while the Python file is green since it’s a new file. If we had removed a file, it would be marked with a red icon.
On the right we can see the actual changes.
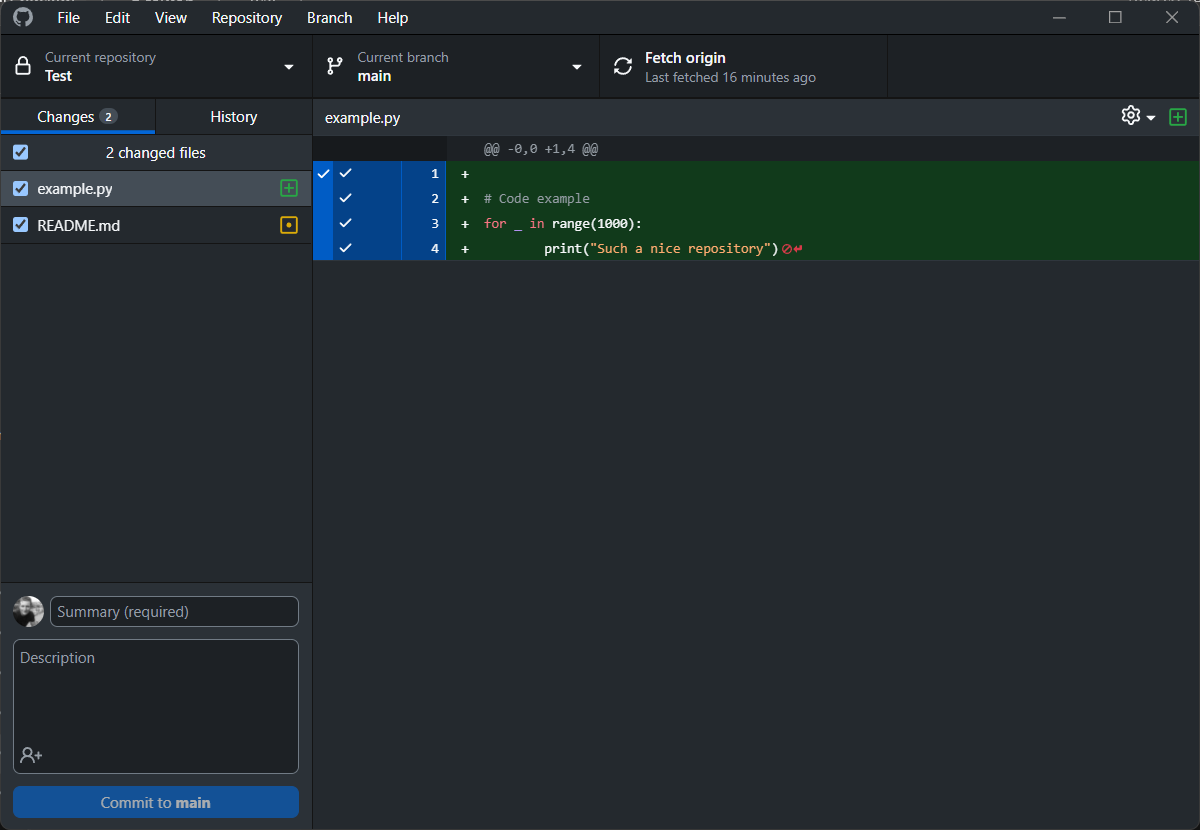
The most important section isn’t the list of changes but the bottom left part, where we can add a summary (mandatory!) and a short description of the changes. For example, in the summary, we could write “Adding Python file” and in the description, “Python file looping 1000 times and printing ‘Such a nice repository’.” Once that’s done, we can press Commit to main.
But what does Commit mean? A commit is one of the three core actions when using Git and GitHub. Committing your changes means saving them and preparing them to be part of the repository, but it doesn’t immediately affect the remote repository (the one on GitHub). Instead, the changes are recorded locally on your machine.
Commits are a great way to keep track of your changes. Whenever you modify your code for a specific reason, it’s a good practice to commit those changes with a clear summary and description. This helps in tracking changes over time and makes it easier to revert to previous versions if needed (we’ll cover more on that later).
Note that commits can be stacked, meaning you can make changes, commit, then make more changes and commit again, and so on. You have flexibility in how often you want to commit. You don’t want so many that you get lost in useless summaries, but commit often enough to highlight specific changes clearly.
Push
We have now registered (committed) our changes, but they only exist on our local machine. To add them to our GitHub repository, GitHub Desktop suggests we “Push origin” with a big blue button.
What does “push” mean? This is the second core action when using Git and GitHub. Pushing sends your committed changes from your local machine to the remote repository on GitHub, making them available for others (or yourself) to access from anywhere. Ok, let’s try! Push you commits to Github. It will just take 1 second and tada!! your update code is on github.
Pull
Pull is the third and last core action when using Git and GitHub. Pulling updates your local repository with the changes that have been made on the remote repository (the one on GitHub).
For example, imagine you accessed your repository from another computer, made changes, and pushed those changes to GitHub. Now, on a different machine, your local repository isn’t up to date with those changes. By pulling from GitHub, you download and integrate the changes into your local repository, ensuring you can continue working from where you left off.
It’s possible that you’re not the only one updating the GitHub repository. If you’re collaborating with others, they may have made changes that you don’t yet have on your local machine. In that case, you would need to pull those changes to ensure your local repository stays in sync with the remote repository and includes all updates made by your collaborators.
For the sake of this tutorial, I went online to my Test repository and added another line to the README (“The code is complex”). I committed the change directly online (no need to push, since the change was made in the remote repository). Now, GitHub Desktop is notifying me that the remote repository has changes that my local folder does not have. By pressing Pull, my local folder will be updated with these changes!

You may need to press Fetch origin in GitHub Desktop to check if there are any changes in the remote GitHub repository that are not yet in your local repository. This action updates GitHub Desktop with the latest information from the remote repository, letting you know if there are any changes that need to be pulled.
Reset Commit
You might be wondering, Isn’t this more complex than services like OneDrive or Google Drive, where you just add code to a folder and it syncs between devices? Well, yes and no!
GitHub offers several advantages over simply syncing files with those other services. First and foremost, GitHub is fantastic for sharing and collaborating on the same code with multiple people because:…
Version control: GitHub tracks every change made to your files, allowing you to revert to previous versions, view history, and compare changes.
Branching and merging: You can create separate branches to work on features or fixes without disturbing the main code, then merge them back when they’re ready.
Collaboration tools: GitHub makes it easy to collaborate with others through pull requests, code reviews, and issue tracking, keeping the workflow organized.
Those are all amazing reasons, but to be honest, if you’re just starting out, many of them won’t apply to you right away! However, there is one advantage you can leverage even now—version control.
As we mentioned earlier, GitHub tracks all the changes you commit to your repository. This tracking isn’t just for show! You can actually go back to a specific commit, for example, to undo code changes that might have been wrong or problematic. This ability to revert to an earlier version of your code can save you a lot of time and headaches, even as a beginner!
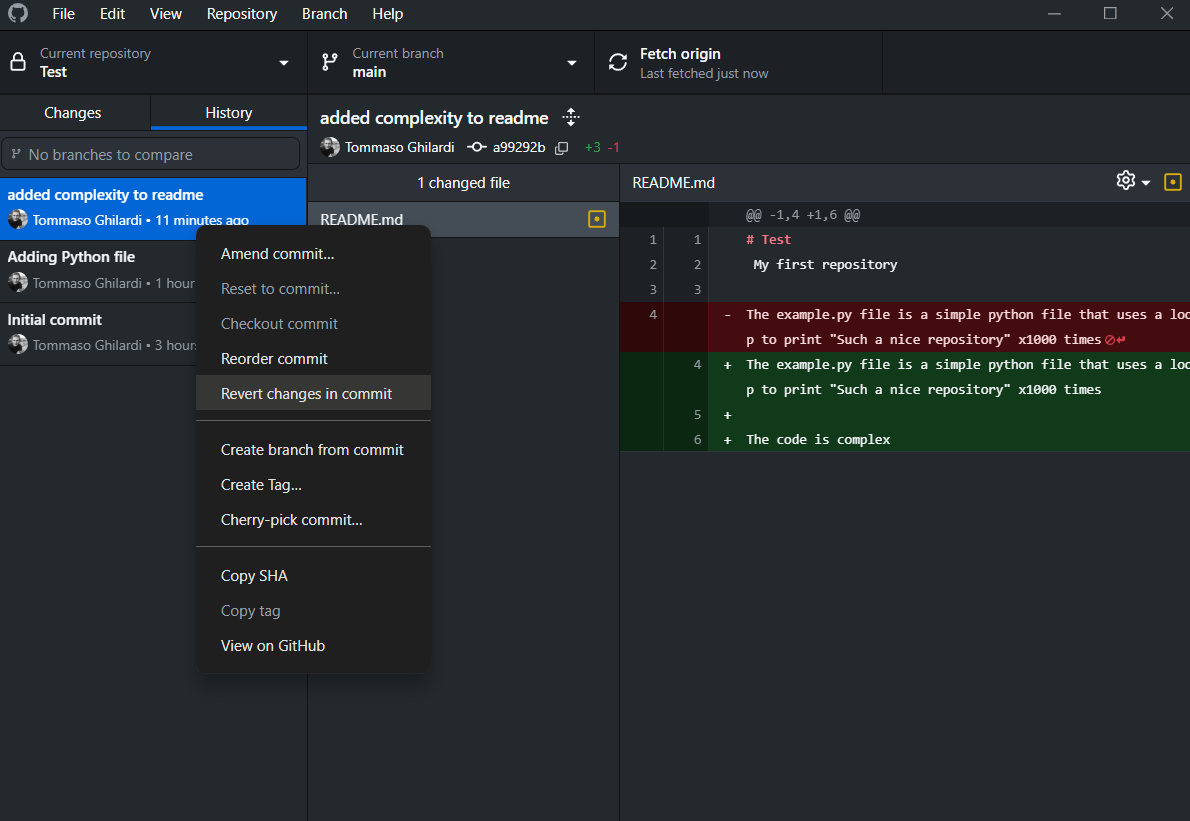
Go to GitHub Desktop and click on the History section on the left side. Find the commit you want to remove, right-click on it, and select Revert changes in commit. In our case, we want to remove the previous commit we pulled from GitHub that added the line saying “The code is complex,” and we want to undo that change!
Tada! We’ve removed the change! Now, if you want to update the GitHub repository as well (not just the local one), simply push the new changes online. This will ensure that the remote repository reflects the undoing of the previous commit.
The end!
This is the end! I hope this tutorial helped you get started with GitHub Desktop. Remember, there’s much, much more to Git and GitHub. Explore GitHub’s website to learn more, and don’t forget there are plenty of tutorials around the web to dive deeper into specific features and workflows. Keep exploring and happy coding!